• expired

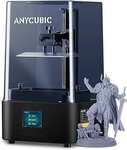
ANYCUBIC Photon Mono 2 3D Printer + 1KG Plant Based Resin $120 Delivered @ Anycubic Store via Amazon AU

530
This post contains affiliate links. OzBargain might earn commissions when you click through and make purchases. Please see this page for more information.

This is a lightning deal so you need to be quick. In order to get this price, you need to tick the $100 off Coupon on the 3D Printer and add to cart.
https://www.amazon.com.au/gp/product/B08HH329TR

Then add the 1KG Resin to cart.
https://www.amazon.com.au/dp/B07YZ7F55V

Both need to be purchased in the same order. Price will be $120 at checkout
Price History at C CamelCamelCamel.

Related Stores

Amazon AU
Amazon AU
Marketplace
ANYCUBIC AU
ANYCUBIC AU

closed Comments

  • +2

    Missed out !
    Changed screen to click the resin code - already up to $320 - $100 = $220

    Doh!

    Still a great price @ $220

    • +1

      I got one to try out as I’ve never done anything like it, so can sell onwards if you’re keen if I don’t use it? $120 seemed to cheap not to give it a whirl

      • Great for small intricate items & modelling parts etc.

        You'll love it if this is your thing…

        • Yeh I’ve really not got any idea.. total impulse buy, but this will at least force me to learn a bit about them and see if it’s something I could enjoy

          • +1

            @Bahrgain Victorious: Have a look at a few websites like Thingiverse, Cults3D and MyMiniFactory. There are so many awesome things you can find to print

          • +15

            @Bahrgain Victorious: I think anyone who bought this impulsively without previous plans of getting a resin printer are going to not end up using it. Resin printing has a A LOT of work involved. Make sure you look up proper safety steps.

            Here's the basics:
            1. Do NOT pour resin or anything that contains resin down the sink or into nature. You have to hold onto it and dispose of it properly at a chemical disposal site.
            2. PPE: You'll needs lots of gloves, don't let this sh!t touch you at all until it's been fully cured. Eye protection, you can go blind id you get it even a little in your eyes. Active respiratory protection. And a place to put the printer that has a vented air supply and is away from people or pets.
            3. Congratulations on getting a resin printer in addition to what's mentioned above you also need to get a few extra things: Lots of Isopropyl alcohol as the solvent to wash your prints, Lots of wipes for the resin you will spill, plastic lining for the things you want to protect from resin such as the table. Different containers for your IPA. UV lamp or a cure station to cure your prints, you can leave them in the sun to cure but it takes longer and has to be somewhere away from people because it releases a lot of toxins during this step. A turntable for curing your prints evenly lest they warp (cure stations have this built in). Replacement FEP when you inevitably break yours. Potentially a heating solution because resin doesn't like being cold or changing temps much, might not be a big issue yet with warmer weather on the horizon though.
            4. Once you've figured out how to dial in your first prints you can go down the rabbit hole of learning to support your own models. If you weren't dettered by all the work resin printing is so far, then this will be sure to make you dread it. Then you can start paying for a subscription to support and slice your models when you realise all the good ones are paid unlike FDM printing (don't actually do this).

            Good luck! The quality looks amazing in the end :) If you want other tips/advice let me know.

            IMPORTANT: The mono 2 uses an oversized screen protector, this is ASS, cut it to size when applying it to the screen. The oversized one sticks horribly and leaves air gaps at the sides, but more importantly if you do end up spilling something past the oversized edges it gets sucked underneath and towards the screen. Cut to size, it means the resin will never actually get onto the screen.

            • @Castcore: Sick tips, thanks! These will be helpful.
              Will the FEP break so fast that I should get a replacement ahead of time? I have FDM printers so I don't plan on absolutely blasting this thing.
              What temp is too low for the resin? 0C? 5C?

              • +6

                @Joost: Personally I've had the same piece of fep for about a year now but it is starting to look real buggered. It shouldn't break that quickly from normal use (it will eventually) but it can tear pretty easily if mishandled. Basically don't use anything sharp on it, not the plastic scraper that comes with it like they suggest in the manual, if you're going to rub anything in there, make it a silicone spatula or gloves fingers. The other thing that can tear a piece of fep is any left over bits of cured resin floating in the resin, when the build plate goes down as you start a new print it can crush and tear the fep and sometimes even break your screen. Make sure you check your resin in the vat before a print I usually do this while mixing the resin with my fingers. If I'm sus that there might be stuff and can't remove it, use a filter that comes with your resin/printer to pour the vat into the bottle and filter out bits.

                If you get a failure or know something is stuck to the fep then you can run a short fullscreen cure cycle, this will create a very thin layer of cured resin across your fep, you can then use your fingers to peel this off and it will take any bits of other resin stuck on the fep with it. Sometimes it can be hard to get a grip on this thing layer so you can stick an old support in there before running the cure and the bottom layer will bond to it and you can pull it all out. The manual says to use the plastic scraper, don't do this!

                The mono 2 is a little annoying when it comes to fep, because they want you to buy pretensioned little frame things with the fep installed in them. This isn't as cost effective as just buying fep but because it isn't designed to replace only the fep like other printers you need to 3d print a new frame that will let you achieve this. Think of it like a rectangle frame that clamps the fep, both ways work, the pretensioned frames are easier.

                Temp depends on resin but I'd say min temperature is like 15°C and ideal is 25°C. The temperature has a huge impact on the resins viscosity and will alter the curing properties. So colder temperatures will usually require a slightly longer layer cure time, and then because the resin is more viscous you need slower print movement settings because you don't want thin parts to drift while moving through a more viscous fluid (think of like lowering a piece of rope into still water if you go slow enough gravity will keep it straight, but then if it's into honey you'll have to go even slower, obviously a super exaggerated example and not quite the same but basically less viscous is much better). Curing of resin is an exothermic reaction (creates heat) so if it is going ot be cold then you can often get away with sitting the resin bottle in the sun or warm water up until putting it in the vat, and then the print process will keep it somewhat warm, but this works better if it's a full plate, one small item won't create that much heat. Currently I use a brewing belt wrapped around my vat to keep it warm, it cost me like $20 with a power limiting dial on it, but for best results you probably want a temperature controller because if it gets too hot (which brewing belts can) you can ruin your printer. I'll make a temperature controller at some point but currently I just check on it regularly and turn the dial down once it starts printing and then just pray. Going into summer I genuinely think it won't be as necessary so don't get one right off the bat. Also if you get resin on your skin get away from the sun/UV and clean it off as quickly as possible, that exothermic reaction will give you burns there's horror stories our there. And eye protection is so important it's unlikely that you'll just spill resin into your eyes, but when you're removing supports from prints little bits flick off and it's quite unpredictable. There is unfortunately a story of kid going blind because a tiny part of the support snapped off and flicked into his eye. I myself need to remember this because it's so easy not to and so not worth not doing.

                What else can I throw out hmm. Water washable resin works but isn't as good as the normal stuff. If money is no object go for gold, but really cheap quality resin for Warhammer/minis is "SUNLU Abs Like". I use dark grey and can give ballpark print settings. It's not perfect, but you can usually get it for about $20/L on eBay if you get a couple bottles and used by heaps of people in the community. For dialling in your print settings you can use a print called "Cones of Calibration" version 3+, it's really good model and has great community support behind it. Look up the "Table Flip Foundry" discord for community support.
                When washing your prints use a 2-3 tub system the first tub does the bulk clean and is super dirty, second+ tub you try to keep as clean as possible by getting most of it off in the third. This makes it so you're getting real good final cleans, and makes the IPA last longer. Once the tubs start getting bad the 2nd tub becomes the 1st, 1st gets disposed or filtered (look up ways to do it) and so on. Getting proper clean minis is important for the finished product. Always let dry before curing even if you intend to cure inside water (some people do this).

                Oh just thought of something that is definitely a pro tip. I've had hardly any failed prints, especially when it comes to build plate adhesion and this is because I don't level it with a piece of paper. Instead install your vat, put a small amount of resin in the vat, 3-5mm high maybe. And then undo all the level screws and home your build plate. It'll get lowered down into the resin then you want to evenly press on the top of the build plate with a good amount of pressure (you will figure out how much works with experience) don't put your body weight on it, but it should be more than honking the car horn, try keep it even on both sides and do up the screws while doing this. Go in an X shape to do them up so corner to corner (top right>bottom left>bottomr right>top left). Then hit the zero button and you're good to go. Now when removing your first prints (slide the plastic scraper along the build plate and just dodge cars the shit out of them) they should be on there solid, if they're not then consider using more force next time, if they're on there too good, then less. If you notice they're becoming easier to remove over time then re-level it.

                All I can think of for now, just ask if you've got more questions :)

                • @Castcore: Hell yeah! Thanks for the detail!
                  You're talking about the temp of the resin while printing? I didn't think of that, 25C, will do. What about safe storage temperature range though? Last year in my kitchen, my olive oil started separating from the olive wax, which means it was below 4 degrees, I'm pretty cheap when it comes to running the heater lol
                  The eye thing makes sense. Lucky I wear glasses. I knew a guy who managed to flick a shard of glass off the ground into his eye while sweeping. With a full length broom. Anything that can happen, will happen eventually.
                  Rotating the wash bottles like that is something I probably wouldn't have thought of. That's super smart.
                  I'll remember that leveling tip too.

                  • +1

                    @Joost: Yeah temp while printing will have the biggest difference on print success and quality. Don't worry about it too much, it will still print in the cold, I definitely pushed the limits during winter. But just keep it in mind if you're starting a print on a 8°C night or if you're getting inconsistent results.

                    Storage temp doesn't matter too much as long as it's not extremes, the resin and colour will start to seperate regardless. Make sure to give it a solid mix/shake before starting because of this, then let it settle for a bit so the air bubbles work their way out (they can leave small holes in your prints). A good approach is to slowly pour the resin onto the elevated build plate and let it run off into the vat, if the stream running off is thin then 90% of the bubbles escape very easily in this step.

                    Sorry for all the typos I should have proofed my previous message. **For the tub system the first is where you should get most of the resin off. Doesn't need to be tubs either, jars work too especially for minis, just try use something you can seal to prevent it from evaporating and keep in the smell.

                    Good luck and enjoy!

            • +1

              @Castcore: @Castcore really appreciate the in depth info there, looks like it's going to be quite the process, but I'm a sucker for details, so somewhat excited to give it a go. I'm sure I'll be thanking you far into the future with the tips here.

              • @Bahrgain Victorious: No problem! It is pretty exciting, I held off for so long because I didn't want to deal with the mess and tbh I use it less than I would like to because of the effort, but the quality is amazing and even though I don't play much Warhammer/DnD myself my friends do and I feel good being able to do stuff for them.

                Try get by with the minimum for now and then you can always get more stuff to make it easier if you think it's worth it. As long as you've got gloves, eye protection, and you're not putting it in your room, you'll be okay :)

                Also I added a bunch of random info/tips above for someone else if you've got time to give it a read.

            • @Castcore:

              1. If you're going to drink the resin, be sure to wear gloves.
      • +1

        Just know that resin printing is not like fdm.

        There are a lot more PPE precautions to take, and the resin printing process is only the beginning.

        You need to wash and cure the prints.

  • +2

    wow deal of the week for sure for those who snagged it. i still remember when 4k printers were the bees knees. amazing price

  • oh no missed it :(

    • I’ve just got mine in the mail and will be selling it if you’re interested

  • +1

    Words cannot express how upset I am about missing this.

    Weekend ruined :(

    • +2

      You can usually get the mono 2 for ~$150 on eBay. Wait for a discount coupon which seem to be happening constantly and then make an offer for less, they basically always accept to make the sale.

      • Thank you :) now I have something to distract me.
        $150 is 'close enough' to this. I'll see what I can bargain.

      • Can you point me towards any good sellers?

        Had a good search and most are over $300.

    • +1

      Stock only lasted 7 minutes, don't beat yourself up about it.

    • I’m selling mine if you’re interested? I’m in NSW if that helps? Brand new in the box, it arrived today but was definitely and impulse buy

  • +2

    Absolutely guttered about how quickly this ended. Time to watch FB Market in VIC hoping for someone selling off an impulse buy I suppose.

    • That’s me - got mine this week, still in box and intend to sell. It was an impulse buy

  • can it print a gun… asking for a friend

    • +2

      Yeah maybe we can make a club for it and share tips haha

      Let's meet up soon

      -Not a fed

  • +1

    Is there a way to set alerts for lightning deals?

    • I know 3x camel isn't useful cause it doesn't register short duration price drops, at least in my past experience. I'm also interested to see if there's a way.

  • +2

    Genuinely butthurt about missing this one.

    Would have been perfect for Warhammer bits.

    • the good news is someone mentioned its easy to get for around $150 on ebay usually which is still an amazing price and less than 1/4 what i paid for a 4k when they were new

      • +1

        Yeah I'll keep an eye out.

        The toy fund is pretty low right now so it might be for Xmas.. is the small size frustrating?

        • nah unless you plan on printing large vehicles, its perfectly fine for minis (assuming thats your use case). and larger models can be printed in parts anyway

      • +1

        eBay looks largely sold out right now unfortunately, but fingers crossed there's a restock sometime soon.

  • Woah… Blink and you'll miss it.

  • Would anyone be able to share a screenshot of their invoice please?

    • -2

      do you want my ID scan with it as well?

Login or Join to leave a comment