• expired

Creality Ender 3 V3 SE (Direct Drive, Auto Level) $249 Delivered / C&C / in-Store @ Jaycar

1350

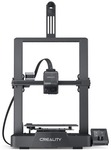
This is a super price on a very capable, entry-level 3D printer. It's the perfect choice for those looking to dive into the world of 3D printing without breaking the bank. I bought at its RRP of $349 and was very happy with it at that price, but at $249 this printer is a steal!

From my experience, it prints quite well out of the box, but like with pretty much all 3D printers, expect that some tinkering will be required.

Features:

  • CR-Touch for easy bed levelling
  • Nozzle temperature: up to 260°C
  • Filament compatibility: PLA, PETG, TPU
  • Heated bed: up to 100°C
  • Typical printing speed: 180mm/s
  • Extruder: Sprite direct drive
  • Build volume: 220x220x250mm

Related Stores

Jaycar Electronics
Jaycar Electronics

closed Comments

        • Haven’t tried it on the A1 yet. Might be next step. Will report back once it’s done

          • @NachoCheese: PETG is very prone to moisture, my rolls even from factory have had to be dried before using.

            I got a cheap food dehydrator from kmart to use.

            • @impoze: Just printed a benchy on the A1 using PETG last night. No stringing whatsoever on stock settings using Bambu studio. I’ll print a benchy and match the filament settings on Orca and do another print on the SE when I get home from work.

              • @NachoCheese: I did some PETG and had stringing too.

                Turning off Z-hop got rid of stringing for me. Setting it to 0 mm.

                In orca, printer settings - extruder.

  • Do you have to calibrate esteps with this model. I have been busy printing a few things and tweaked a few settings to reduce stringing but the only problem I have at the moment is the print head seemingly hitting the print occasionally.

    • Always good to do a check, and just has to be done once.

      I did the measuring test and didn't need to adjust it.

  • I got this a week ago and its my first 3d Printer.
    This is amazing.
    Buy some Bostik Blu Stick from Office Works, don't get it from Silly Solly's.

    @impoze can you please share what guide you used if any?

    I have Octoprint running on my phone, had it on at RP4 but made the mistake of getting Tapo Cameras and even though I work with network cameras in a professional capacity, the frustration runs deep with this things… So couldn't get it working with RP4. TL:DR its easy mode with an old phone, like you wouldn't believe.

    • +1

      Don't bother with glue stick, just just a PEI sheet around $15, the prints stick well and pop off effortlessly.

      I linked up webcam yesterday to klipper last night. Took 5 minutes and literally plug and play.

      I'll share a few links later today

    • +1

      For Klipper installation,

      I used this guide: https://artamis.me/projects/klipper_guide/

      KIAUH makes the install process very simple.

      Adding webcam or cameras is almost plug & play with crowsnest

  • @impoze yeah man I got a PEI bed, still rocking the glue stick though, makes the first layer fool-proof and I am a noob so happy to keep going with it., thanks for the info :-)

  • Where's a good place to buy the brass threaded inserts from? They seem kind of expensive especially for the good ones that won't pull out easy.

    • Aliexpress

      • Less than 3c each and free shipping. No brainer thanks.

        • also magnets, M2/3/4/5 nuts & bolts

        • do you have the link?

          • @pinkybrain: Plenty on Aliexpress

            Buy from Choice listings for quick delivery

            Use the current coupons of the month

            https://www.ozbargain.com.au/node/848029

            • @impoze: I meant link for "brass threaded inserts"

              I have no idea what is suitable…
              do they work on all 3D printers or just this model?

              • @pinkybrain: They are for inserting into 3d prints for adding points for bolts.

                It's used more for practical printd

  • +1

    Just finished a 5-6 hour Squirtle on the SE

    Front
    Back
    Side

    Planning to prime, sand & let the kids paint them

    • The little wispies are after hitting it with heat gun so just need to brush them off.
    • Tree supports came off cleanly, usual sanding & filing for some spots.

    https://www.printables.com/model/181156-squirtlepokemon

    • is that printed in PLA?

      why did it take so long to print?

      • Yeah just matte grey.

        Did a little sanding and filing to clean up support areas. Next, I'll be giving a coat of filler primer before sanding out to smooth for painting.

        • how big is the model?
          and why it took 5-6 hour to print?

          Have you also consider trying ABS and do ABS vapor smoothing afterwards?

          https://www.youtube.com/watch?v=NiG1jDEG0kA

          the result would be 100% better and no need to sand it

          • @pinkybrain: ABS I will need an enclosure and more ventilation for fumes.

            5-6 hours because that's the time it takes. 0.2 layer heights, tree supports.

            It's about 15cm tall

  • Anyone suffering from bed adhesion issues yet? I think I may need to do a manual level on this machine.

    I understand how to level the print head from left to right but dunno about front to rear?

    • have you cleaned the bed with IPA or some dish shop after a few prints?

      After it auto levels, you can also adjust each of the 16 points manually. The bed doesn't have adjustment knobs, but make sure all the bolts are tight.

      • I tried cleaning the bed with IPA. Didn't fix it. I tried doing an automatic level and adjust the z axis offset many times. Didn't fix it.

        I went all around the machine and tightened up all the screws and I could NOT believe how loose all of the screws were. It's a wonder the thing held together at all. Unfortunately still couldn't stick a layer to the bed properly.

        What fixed it was doing a manual level from left to right on the gantry. I followed this video to do it:

        https://youtu.be/iaExzAYR_Fo?t=57

        As soon as I measured the height of the gantry on the left and right sides it was clearly out. Now my Y axis is good.

        The X axis is definitely out as well by doesn't seem to affect the print? Not sure why. I might have a crack at levelling that one manually as well.

        • Glad you got it sorted,

          I might also check out my Y axis.

          For the X axis I printed out the small shims to put underneath the screw posts. Mow have a differential range of 0.3 from 0.6

          • @impoze: Thanks for the tip on shimming the X axis. I know that aluminum foil has a reliable thickness which would be about right for shimming this one. I should just be able to fold it to the required thickness. Would be quite satisfying to see all green lights on the automatic levelling procedure. Might give it a go a bit later on if I have time.

            • @OBEY YOUR MASTERS: Was still getting a few issues with bed adhesion. I took the bed off and shimmed the back two screws to bring the bed to level. Got her pretty dang close.

              https://ibb.co/FWwdT9b

              The prints seem to be bedding down much better and also more well defined although I am using glue stick now too. Less broken beads especially after the 1st layer.

              • @OBEY YOUR MASTERS: Nice, that's a real good bed reading and easily compensated by the mesh.

                One other thing you can try is fine tune the Z offset after the auto. Up or down a slight can make a difference

  • purchased, thanks op

    • +2

      nice, two of my mates have it as their first 3d printer and they have printed heaps already.

      don't really need to upgrade it but recommended is a PEI bed and print out a side spool holder to get the weight off the top of the frame.

  • I'm trying to calibrate Pressure Advance with Orca. My beads aren't starting quick enough and it's messing up my prints especially where there are short lines. However when printing the Pressure Advance tests they all look the same?? Is the firmware somehow preventing me from setting this up properly?

    • Are you running klipper or stock marlin?

      Marlin uses linear advance, the PA tests won't work

      • Just using whatever the stock firmware is from Jaycar. I got some bad prints from the Creality software that were affecting the walls of my print but only in one specific place. So I switched to Orca to see if that would fix the problem. But as I discovered I'm getting problems elsewhere with that as well. The beads aren't starting quickly enough so I'm missing plastic in the tight spaces on my print and at the start of long lines.

        • Hm ok, how's the first layer look?

          And whats the mesh array colours on the screen?

Login or Join to leave a comment